Exploring Premiere Pro
Above is a video that I edited with Adobe Premier Pro to express a feeling of serenity and calmness.
What is Adobe Premier Pro?
Adobe Premier Pro is a video editing software created by Adobe that can be used to edit movies, documentaries, and promotional videos. It is generally based around a “timeline” that you can drag clips and videos to, and offers many tools and features that one can use to edit their videos.
What are the most powerful tools or features of Premier Pro?
Some of the most powerful tools on Premier Pro include the ability to “layer” audio and video tracks, and transitions, add titles, and clip audio and video files.
What are some free video editing tools that are available to you?
Some examples of free video editing tools are..
- iMovie
- Clips
- Blender
- Shotcut
Animation
Below are 2 animations that I made, one on paper and one using Adobe Animate.
What is frame-by-frame animation?
Frame-by-frame animation is when you draw many different images, known as frames, and move the image you’re drawing slightly in each frame, giving the illusion of movement. This can both be done physically on paper, or digitally on a computer or tablet.
How was the animation process similar and/or different — on paper versus Adobe Animate?
Personally, I found the animation process a lot easier on Adobe Animate compared to on paper. It was a lot easier to edit and change things digitally as compared to on paper. You could also control how your animation turned out a bit more precisely on Animate by controlling the frames per second and the length in between each keyframe. On paper, your animation might turn out differently each time, as you might flip the flip book at different speeds. However, even with all these differences, I was still very happy with the result of my flip book.
What did I learn about animation?
Firstly, I learned a lot about the origins of animation, and how animation looked like 30-40 years ago. Then, I learned about how animation worked and how to make animation. Animating really develops some important skills, such as planning (start and end points for your objects), creative thinking, and most of all, patience. While animating, I realized that it was a process that required a lot of patience, as you had to draw each frame one by one. It takes over an hour just to make an animation that lasts 2 seconds! However in the end, I feel that it was worth it, and it was time well spent.
Powtoon
Today, we explored Powtoon. I like this tool because it is simple and easy-to-use and can quickly and easily create animations. It offers a lot of choice and flexibility, with its editing tool that allows you to edit almost every aspect of the animation. In the future, I think I could use this tool to create more videos for different purposes, and not necessarily for resumes. Some examples might be for school projects or when I need to display information.
Resume Video:
Exploring Photoshop
Before:
After:

What I wanted to communicate with my photo
With this project, there wasn’t really a single “before image”, but rather multiple ones. First, I took pictures of the covid posters around the school as they represented some of the safety measures we all took to prevent the spread of covid-19. Then I took a picture of the wall as I was looking for a blank space to “hang” the posters on. For the frame of the “posters”, I used a picture of a bulletin board I found around the school. Together, I combined all the images with clipping masks to form a “memorial wall”, to highlight the events that everyone went through during the period of covid-19.
What photoshop tools did I use to modify the “after” photo?
I used the clipping mask to photoshop covid-19 posters into “frames”, which I then “hung” on the wall. Then, I added words underneath each poster to further emphasize what each poster was representing (responsibility, teamwork, social distancing, shutdown of facilities, etc.). For some of the posters, I rotated them to make them all face the same way. I also used the “shadow and highlights” function to ensure the lighting was balanced throughout the entire image.
What do I want to learn next in Photoshop?
Next, I would like to learn more about the tools and features that photoshop offers. I am excited to see how these tools will expand my “box of tools” and how they will impact future projects.
Cloud Technology
What is Canva and why is it useful?
I find Canva useful as it is a powerful tool used to create visual designs while also being easy to use and navigate. Canva can be used to create posters, infographics, newsletters, and even things such as video collages!
What are some advantages of cloud based technology?
Cloud based technology has many advantages, with the main one being that you can edit and work on projects stored on cloud based technology anytime, anywhere. Files are no longer stored on your computer hard drive, and instead, stored in a virtual “cloud”. This allows you to be able to work on projects even if you’re on a different computer!
Below is a copy of the infographic Finley and I made about disinformation.
Disinformation Infographic by Alan and Finley
Social Media and Me
Attached is a copy of the PowerPoint i made for this project:
Exploring Python
What is Python?
Python is a programming language suitable for beginners as it is friendly and easy to read for those who have no prior coding experience. It is a flexible code that can be used to print statements, create games, and much more.
What do you find the most interesting about Python?
So far, I find modules (such as time.sleep) the most interesting in python. It is amazing how you can open up so many more possibilities and gain access to much more commands by just entering a single import line of code in python.
What do you want to learn next in Python?
Personally, I wish to learn more about the various modules in python and how to use them. Learning how to build gui’s or other interfaces with modules such as tkinter would be interesting.
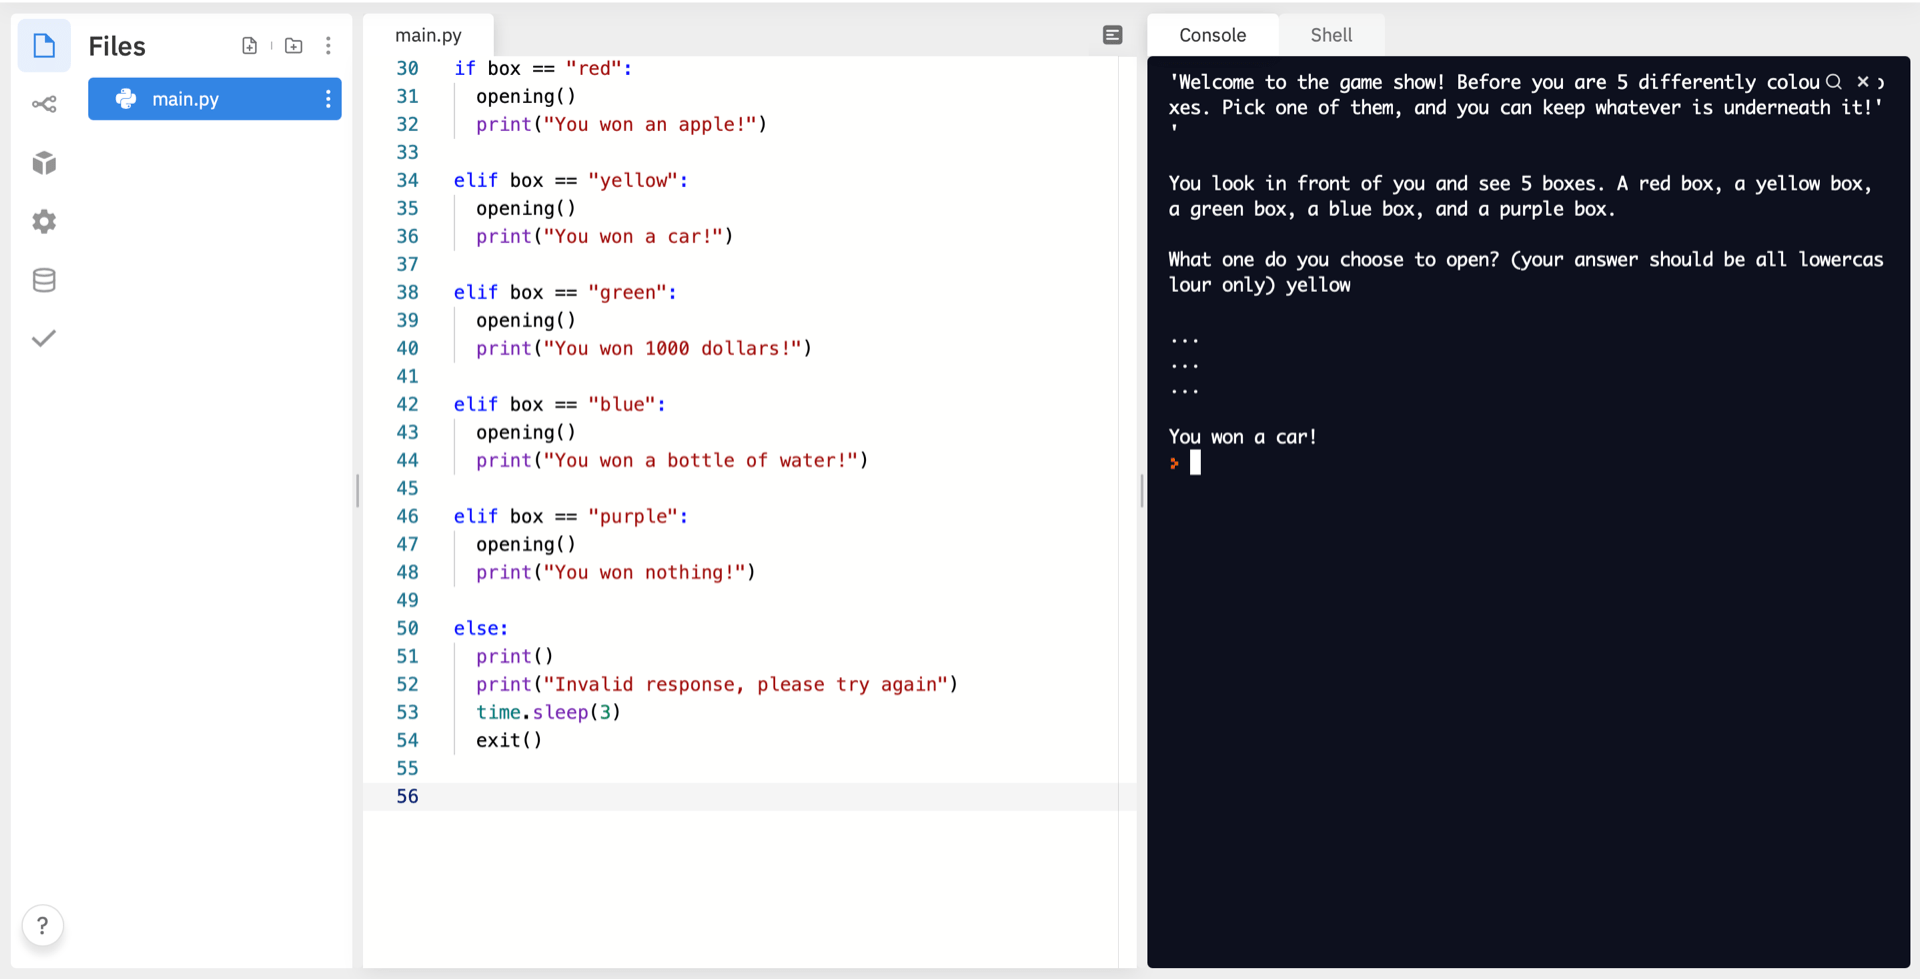
Below is a image of a project I did recently, called the “Coloured Box Game”
HTML & CSS
During this project, I used various forms of HTML, including heading, paragraph, italic, and image tags. Then, I used CSS tags such as text-align, text-colour, br (new line), and hr (separator line).
I would like others to notice both the design of the webpage, as I tried to use and build on the skills I learned from previous lessons and projects to build the website.
I chose to add the creative thinking tag as I think that it was the main core competency I used during this project, as naturally, building a website requires a lot of creative thinking, from layout, to colour, to images used. I also added the making tag as I felt that making the website was a big part of the experience and process, as you had to combine multiple design elements and tags in order to create one final website.
Image of Website:
App Development
Study Assistant
Poster

What it Does
The app that I created, “Study Assistant”, acts as a companion to you while you’re working. It carries a variety of functions designed to help you improve your work habits, stay productive and on-task.
The main input source of the app is the user. The user can input data such as the length of the study period, set goals as to how many hours they wish to stay productive every week, and if they were productive or not during a study session.
Data is processed in the app in 3 main ways. If/then, counting, and comparing. If/then is used in numerous places around the app and is the fundamental feature of the app. An example would be if the “home” button was clicked, then go to the home page. Counting is used while the timer is active, as it will count down from the length the user inputted. Comparing is be used for the charts, and will compare data between two weeks.
The output from the app will include functions such as a dimmed screen during study period, and charts and data at the end of the week.
Design Process
The main design processes used were defining, ideating, and testing.
During the defining process, I built on a problem that I had myself, which is that it is sometimes hard to stay on task and productive during study sessions.
In the ideating process, I took inspiration and built on numerous ideas that I’ve tried myself previously, such as the study timer, while also creating new ideas such as the chart and the dimmed screen, Then, I combined all of them into one singular app.
I received feedback from many different sources during the testing phase, including from classmates and friends. I took the feedback I received into consideration and further improved my project based on the tips I received, such as adding and defining more inputs, and adding to the “goals” function.
Accomplishments
My proudest accomplishment from this project is the poster. I created it using Canva and I made it when I had zero experience with Canva before this project. I always love learning how to use new software and technologies and I look forward to further developing my skills with Canva and design in the future.
What I want others to notice about the app is its functions, and how relatable it might be to some people. I know many other people who struggle with the same problem as I do, and I hope the functions within the app can help them in some way.